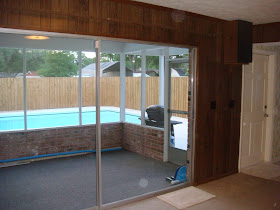
Before:
During:
These pictures are after just one coat of Bonding Primer. I used Valspar's Bonding Primer, against all the evidence on Young House Love to the contrary, because the guy at Lowe's said it really would stick to the paneling and not let any stains through. AND it worked!!
After:
The color that is darker in the above picture is more realistic to the color, I couldn't get the camera to show the true color very well. I love it. The trim is crisp, the doors don't even look a bit like the dark brown from earlier, and I've even switched out the outlets and switches (& covers) to white, which goes with the trim.
Here you can see the tan/taupe color that leads into the kitchen. Very neutral but off-white enough to bring out the trim color.
Colors are:
Blue - Behr No-VOC Seven Seas in Satin
Tan - Behr No-VOC Wheat Bread in Satin
Trim - Behr No-VOC True White (no tint) in Semi Gloss
Lessons learned:
- You really have to just keep painting coats of paint until it looks solid. If you think, "Oh, that will cover it," and it looks splotchy, then you'll hate it in two days. Do yourself a favor and make the extra two hour time commitment so you love the room for years to come.
- Paneling may require caulking gaps in the crown molding above. I'm not worried about it right now, because we can fix it when I paint the ceiling. Yup, the ceiling has to be painted.
- It is very hard to fill in holes in paneling and make them look like they never existed. I did try though....see below.
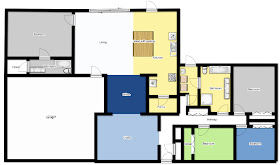
I still would like this room to be the family room with the TV. Remember that we are changing the floor plan of the house, little by little, from this.
To this:
The room I painted is dark brown in the first footprint. It is white in the second, and leads straight into the kitchen by way of the huge island. The kitchen peninsula is still there for now, but it won't be later. Which is why I would like the room I painted to have the TV...I can see what is going on when I'm in the kitchen or when people are at the island.
To do's:
- Test out whether I can stand the TV being attached on the wall that is shared with the master bedroom, or not. I go to bed earlier than my husband which means I hope I cannot hear the TV when I'm in bed, or else we'll have to figure out another plan.
- Paint the ceiling white.
Hang the new light fixture I got (see below).- Hang a new modern floating shelf as a place to catch keys and small tidbits when we walk in the door. Perhaps also a mail station on the wall would help with the in/out mail.
- Figure out whether or not I can dye the curtain in this room. I priced fabric (21 yards worth) in the style I love and it was $375 just for fabric, and then I would be left to sew it myself. Whew, I really don't like sewing straight lines that much. I also priced buying pinched pleated drapes and sewing them together to make the length we need, but that was closer to $600. Too much money. I'm still hoping dying the fabric would work.
The bulbs were always burning out.
You can also tell that we really need to paint the ceiling. Smoking definitely went on in this house before.
And here it is with the new bulbs. The base is plastic, which makes it light, and there is no light leaks from the top, which I love. It also has a linen type siding, which is hard to see in this picture, but it fits into the nautical idea. It's a huge improvement from before.


No comments:
Post a Comment