Pages

Wednesday, February 27, 2013

Camera Project Reveal

Ta-da!

The camera project is finally done.  At this point, I could never have believed it would have taken this long, but I do like the final product.  I think this is a great way to display some cameras you don't need or cannot use anymore.


And see the unfinished light switch?  I fixed that, too!


Here's the finished camera project with all 10 cameras.
 Here are the camera names:
  • 1949 Rolleiflex Automat X
  • 1968 Nikon FTN
  • 1976 Hasselblad 2000 FCM
  • 1946 Brownie Travel Six-20
  • 1976 Polaroid Pronto
  • 1957 Brownie Bullet
  • 1958 T1 Rolleiflex
  • 1984 Canon AE-1
  • 1971 Kodak Instamatic 404
  • 1965 Kodak Instamatic X-15
Ah, much better.  The living room is now completely done.  (Except furniture.  It has basically no furniture.)

If you haven't seen the previous project posts, you can see them here:
Part 1
Part 2

Monday, February 25, 2013

Foyer Reveal

All the steps are done and I'm thrilled with the results.
Before:


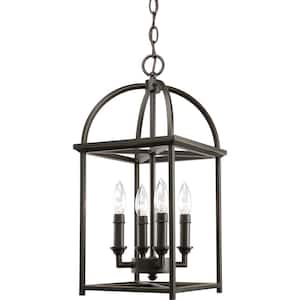
I got a Thomasville light fixture and bulbs at Home Depot to update this monstrosity after painting the stripes.
  I went with a oil rubbed bronze finish so it would stand out against the stripes.  This said it is $218 online (but that is CRAZY!).  I paid $139 in the store without a coupon so I don't know if it was a weekly sale or something weird going on with the prices. 


 Do you like it?  I am in love!
 With the light on!  After:
 Lastly, the pictures that were hanging in the foyer had different frame finishes so I got some spray paint with a hammered bronze finish to make them a little special for the room.  I couldn't find the Oil Rubbed Bronze (ORB) paint that everyone raves about, but I'm so happy I chose this!

Again, this is what I had before:


And after!

 Here's the other posts about this project: Part 1 & Part 2
Saturday, February 23, 2013

Foyer - Part 2

 So we left off in the foyer with the wallpaper removed (yayyy!) and ready to prime and paint. The dingy yellow is from the wallpaper.  Can't wait to get rid of that!

First I had to paint the trim in the foyer, including the front door.  Two coats.  This is the first coat.
 And then after the second coat of trim paint is dried, I taped off the trim so I can start priming the walls.


This post is mainly pictures.  So here it is primed....
 Primed....
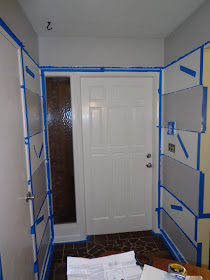
 And after the primer had dried for a day, I taped off for the horizontal stripes I'm going to paint.  The tutorials are everywhere, and to get a perfectly crisp line you should really follow this one, it was great.


 Here is the area with the base coat of paint over the taped lines so the edges won't bleed.

 And then, after the base coat is painted over the taped edges and is dried, you can paint the colored stripes!


Ahhhh!  Here is the after!  I cannot tell you how excited I am about this update.  It is such a huge change from the wallpaper.


Just one more time.  
Before:
 After:
  
Here is the first part of this project.  More to come.  I still need to update the light and hang pictures with an updated finish to the frame.

Thursday, February 21, 2013

Baby Sprinkle

I hosted a baby sprinkle for my best friend.  A baby sprinkle is a party for a 2nd or 3rd child for a parent in order to celebrate the coming, or already arrived, baby.  This one is for a little girl!  Most of my ideas were from pinterest, so I included links to DIY how-tos for the ones that aren't really my idea.

I made a little flag banner first.  I had a lot of fun making this and it definitely can be used again.  It says Sprinkled With Love.  Also works well for Valentine's Day!


Because it was a sprinkle, I made a little set of rain clouds behind the dessert table, which basically was simply my DIY cupcake stand.


 I made some fortune cookie party favors with hershey kisses.


 I made some pom pom flowers that can be used again.
 I also made a bow making station, because this little girl has a LOT of hair.
 The guests clipped their creations onto a card with a rainbow :)    The guests had a really nice time making them and signing the little homemade card.
 I used a cheap bag of confetti from the Dollar Store to decorate the tables.
 
 No party is complete without a party pooper....