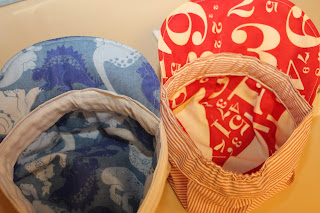
Made these cute caps tonight for someone's special birthday!  Can't wait to see the reaction I get.

 Followed the tutorial at Aesthetic Nest.  Cut the train stickers out of vinyl.  I was going to sew them on, but decided against it.  If they want to wash, the stickers will come off, but the hats are so great!
 Each has a cool liner: dinosaurs for the 1 year old and numbers for the 3 year old.
And of course, the rest of the present is train themed! 
On Friday night I decided to delve into a project to make Millie a cute St. Patrick's Day outfit.  Mainly, I wanted it to have a rainbow and a pot of gold.  My idea was to make the rainbow out of ruffled strips of each color.  Then I wonder undered a cloud and a pot of gold.  The "gold" were yellow felt flowers I picked up at Michael's clearance table.  They look so perfect though.
 The skirt went with a different outfit.  But it worked to make the set a little more green.  And of course, nothing is complete without a headband.  Millie hates headbands!

I don't want to wear this headband!

You take it off right now!  I mean it!

One more thing.  In this case, the white oneise I modified was too large.  To make it "fit", I simply sewed the top sides of the neck opening together so it would stay on her shoulders.  You can kind of see the two places where I tacked it together in the last picture.
I'd been looking for a great cupcake stand that I can use for any party at all, so I came up with making one with thrift store finds, like a lot of bloggers have done in the past.


I found 3 circular glass plates and tried getting three that would go "together" but weren't matching. The bottom plate is very big, over 16" in diameter.  I toyed with the idea of spray painting the stand pieces different fun colors but in the end decided that I wanted the cupcakes and their details to be front and center on the stand, so I left the stand clear glass.

First, I had to try out Gorilla Glue.  This stuff is so easy to work with.  I love the screw-on cap *Gorilla Glue didn't pay me to say that, by the way.  I just love their stuff!

The directions say to dampen the boding surfaces.  So I wet a paper towel and lightly passed over the bottom of the plates and the bottom of the candlestick.  I am putting the candlesticks upside down, which gives the added benefit of leaving more space for the cupcakes on each tier.

Then I put the thin layer of glue on the candlestick bottom, and put that down on the underside of each plate.  They say to use a thin layer because the glue will expand as it dries.  A little goes a long way.  Then I also followed the directions and used a weight to press down on the candlestick so that it would bond better.  In this case my weights were kitchen pantry items.  Sorry I don't own a set of flat free weights.  Hahaha!

Now the waiting begins: 3-4 hours for it to set up. I decided to only glue the candlesticks to one plate, so that I can take the stand apart and store it more easily.

One lesson learned, Gorilla Glue does not dry clear.  I don't mind it since I could easily put a colored napkin on the top and middle plates to cover the ring, and of course cupcakes will also be displayed.  But if you are meticulous and can't handle the off-white ring, then use super glue.
 And, for reference, these candlesticks separates the tiers quite a bit more than the average cupcake stand, which I love, because I can pile up icing and make little cupcake toppers.  Ooh, cupcake toppers, I can't wait to show you those!

Here's more about the Up, Up, and Away Party:
1: Airplane Ticket Invitations
2: Pretend Passport Activity
3: Airplane Glider & Crocheted Kite Party Favors

Kimono Pink and Navy Blue Shoes

Just finished another very cute pair of shoes.  They are the kimono style (points for you if you already knew that) and have tiny little pink bows on each shoe.  I just love the bows.  They really "make" the pair.


If you like these, I am selling them on etsy.
Up, Up, and Away is on its way!  We have:
Invitations & Pretend Passport Activity Books

and now we are going to make party favors that fit the theme.  I gave a hint that I would be crocheting kites as part of this blog post.  And I've started that process.  Here is how I'm going to use them at the party.

We are going to give out gliders as party favors ($8.50 for 72 makes them very affordable).
Here is where I found the kite tutorial.  The pattern she gives out is perfect, but I did start making mine with less rows to make the process quicker.  Awesome job Maize!  I chose three different colors of yarn to work with....I had the purple on hand and am getting low on it, actually. 
Don't they look cute?!?
Here is what they will look like when they are finished, all wrapped up and ready to "fly"!  I'm wrapping them in colorful Dollar Store tissue paper (cheap, cheap, cheap) and then using the crocheted kites to wrap them.  It almost looks like the spool of line you have with a kite.  So cute.  I hope everyone at the party thinks they are great.  And the gliders fly really well too.
 Like this post?  Then Pin It
Found out recently that the fabric I use to make these shoes is not Minky, it is Swiss Dot. Good luck finding Swiss Dot by the way! I got this remnant in a fabric bin at a high end quilt shop and I can't even find it online (for $12.99 a yard, no less).

Thanks to Oh, Fransson! for helping me name that fabric :) Love her blog.  She is a fantastic quilter.

Here is my latest sale:
size 6-12 months

have my very own sole label

all packed and ready to go to the new owner :)
It is the last of the Swiss Dot until I can locate more to use.  Bah.

Keeping It Real

People ask me how I get so much done.  I tell them my house is a wreck.  And then they laugh.  Here's my sewing room after two of my last projects.

I just wanted to show you that this is a work in progress. I have toys, boxes, leftover scraps, pattern pieces, an ironing board & iron, all my fabric stash, all my felt stash, a huge bookcase, and the closet is full of my husband's clothes. All packed up and no place to stow :)
Along with the up, up, and away theme, I am trying to make activities for the kids who are going to be attending the party. So I thought of pretend passports that they can add stickers and color at their tables. I'll supply crayons in the centerpieces, and so I made this with my Silhouette Cameo.  So glad I finally took it out of the box :)


The main idea was my own, but then I went hunting for ideas on how to do the pretend passport and got this great site, which has a wonderful idea for passports you can download.  I borrowed their ID information page.

I used the front page from this site (you know, where the name, ID picture, etc) are, as I show below. I'm going to personalize these with a picture of those kids who RSVP, so it will be extra special.

I have plenty of travel/aviation stickers for the kids to put in the blank pages, but I also included Up, Up, and Away themed coloring pages (kites, rockets, helicopters, etc.).

One thing though, if you like the main cover.  You'll be picking out plenty of tiny pieces from the Cameo cutting mat!

Here are the documents for the silhouette studio files:
Outer cover with PASSPORT & Eagle
First page front with ID information
First page back with kite
Second page front with rocket
Second page back with hot air balloon and airplane
Third page front with mercator map of globe
Third page back with rainbow and helicopter

Here they are in pdf (if you don't have the silhouette):
Picture of Eagle for Passport Front (this isn't the same as the studio file, but you can make a front using this picture)
First page front with ID information
First page back with kite
Second page front with rocket
Second page back with hot air balloon and airplane
Third page front with mercator map of globe
Third page back with rainbow and helicopter

I just printed out the backs from the studio file, then flipped the page over on the printer and printed the fronts with the registration marks. And then cut them on my cameo. SOOO Cute!

If you are looking for more aviation/travel themed party ideas, here is the first part of the birthday party fun!
First Birthday Party - 1 - Airplane Boarding Pass Invitations

Like this? Then  Pin It