The main decoration I planned for my daughter's second birthday was her name spelled out in letters, that looked like the characters from Mickey Mouse Clubhouse.  See?

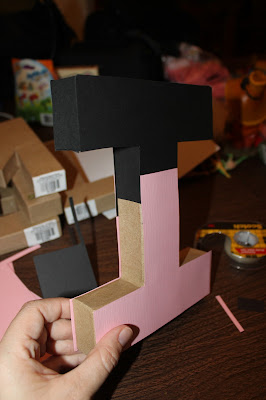
All they are is 8" letters covered in paper to make them look like the characters.  From left to right, we have Mickey, Pluto, Goofy, Daisy, Minnie, and Donald.  I started with Donald and used double-sided tape to adhere the paper to the letters.
I covered the front and backs first, then went around the outside of the letters for full coverage.
I just freehanded the bows, and it wasn't too hard.  Minnie's pink isn't the right color, it should be more like hot pink.
Daisy's purple looks lavender in person, but definitely read differently with the camera.
Goofy's hat is one piece green, I just freehanded the shape, with a blue piece of paper glued on top.  Simple!
Pluto's collar is only taped on the back, which makes it look more like a collar.  You could also add a tag that says Pluto, but I stopped before that point.
Classic Mickey mouse!
And my favorite, Donald Duck.  This one came out the best, in my opinion.  Both Donald and Daisy have a small piece of furry notion, which adds to the "duck" look.
Oh boy!

Like this post?  Then
More Mickey Mouse Clubhouse Party posts here:
Part 1 - Invitations
Part 2 - Goody Bags
Part 3 - Punch Box
Part 4 - Balloon Wreath

I had a straw wreath form and thought that it would be neat to make a little Minnie Mouse inspired decoration with it for the front door.  I saw an etsy shop that makes balloon wreaths and came up with a way to make it myself, saving $50!! 

I believe the only differences between the original idea and mine was that I found only pretty large balloons and couldn't get them any smaller at WalMart, and that my wreath form is much larger which means I needed more balloons.  I didn't really feel like ordering any balloons online.  So I just bought 12" round pink, red, white, and black balloons from the store.  The wreath form I used is 22" I believe.  First, just separate your balloons by color.  You'll also need straight pins.

Then starting at the top, take a balloon and use a straight pin to stick it into the wreath.  The goal is to fold over the balloon so the pin is concealed. 
See how it folds over so you can't see the pin?
Then, keep going, mixing the colors and change the exact way that you pin each balloon so they all look different.
As you go around, you may end up with some spots that aren't as covered, in which case you just need to go back and fill them in with another balloon.
It helps to hold the wreath in the orientation it will be hung so the balloons lay the way they will on your door.  This helps to find those holes that people will see.
Halfway there!  I think a wreath of this size took about 100 balloons, but I cannot be sure because I had several mixed packs and have balloons left over for the party decorations.
Finally, hang your wreath on your front door.  I used polka dot red ribbon to go with the Minnie Mouse theme.  By the way, my daughter's favorite character is actually Mickey, but I thought the pink would be a nice addition to the wreath. 
You could also add a sign to commemorate the special occasion.  I haven't put my sign on the wreath yet, but it will say Happy 2nd Birthday with mouse ears and I'll write it in the classic Walt Disney font you see on the internet.  I'm pretty happy with how this came out.  It will really make an impact on the way into the party!


More Mickey Mouse Clubhouse Party posts here:
Part 1 - Invitations
Part 2 - Goody Bags
Part 3 - Punch Box
Instead of a pinata, because this is a 2 year old birthday party, after all, I went with a punch box.  I found the original idea on pinterest of course, but made my own variant to house toys the kids will get.  First, I used a box on hand and opened it up and cut off two of the flaps so I had some cardboard to work with.  I cut the cardboard from the cutoff flaps into strips the depth of the box, then arranged them in a tic-tac-toe formation and cut slits so they would hold together.

See the slits below?
Then I flipped the box over and used a bowl to draw circles, arranged in that same tic-tac-toe pattern. 
 This is actually the bottom of the box, as you can see with the original packing tape.  I used a box cutter to cut out each circle.  I bet squares would have been much easier!!!
 
  
After all the holes were cut, I flipped the box back around and used double sided tape to stick down pieces of tissue paper to cover the holes.
And then I added a second layer of tissue paper.
Next, add in some toys for the kids.  Mine ranged from bouncing balls, sand toys, a snake, a bath boat, to floam.
Finally, tape those flaps closed and then flip the box over.  Next, I covered up the face of the brown cardboard with a cheerful wrapping paper print.  I wish I had Mickey Mouse paper on hand, but I love to use what I have!  Doesn't it look like fun?  I think the kids, especially 1-3 year-olds will have a blast with this, and I hope the older kids like it too.  I specifically didn't include candy because of the ages, but you could always throw in candy, too :)
Like this?  Then
You can see the other posts for the Mickey Mouse party here:
Part 1 - Invitations
Part 2 - Goody Bags

 
I wanted to make some goodie bags that reminded people of Mickey Mouse, but I don't really like the old plastic kind.  So I was a little crafty and made some felt bags that are very simple to make.  I made 9 in about 1 1/2 hours.  Not bad.  First, I cut out the pieces.  Note, I just cut out handles rather than sewing on handles later.  This makes for a weaker handle, but a happier mother.


 You just sandwich the red square in between the two black pieces.
 Then sew around all three sides (left, right, and bottom).
 And turn the bag right side out.  Now you have an inner pocket, and an outer pocket inside the red square.  I chose to leave it this way instead of sewing the red square down first (saves time and energy).
 Then hotglue on some buttons (I got yellow but they should really be white), and add some goodies for the kiddos!
And that's it!  Simple favors for a group of kids.  You could customize for ages based on what toys you add.

Like this?  Then 

Update

I've been sick for over a week now, which is why there haven't been any great posts about our life or projects.  I did get my husband to put up a horrible shelf from Home Depot, which wouldn't mount firmly to the wall without leaning away from it.  It was to hold heavy glass, so we had to nix that idea.  I promise to continue my pattern of 3 posts a week, once I recover from the funk!


Puddle Splashing

We finally got a rain last week.  Millie didn't know about puddles and we had some nice shallow ones in our driveway.  So we tested them out!


Life is good!